If you want a quick way to test your typing speed, try their 1-minute free Typing test (available in over 40 languages).
Ready to compete against the big guys? Then check out their typing competitions. Every competition is open for 24 hours, during this time you will have the opportunity to reach the first place.
Text Practice Mode lets you create your own text to practice or pick from a huge list of user generated practice texts.
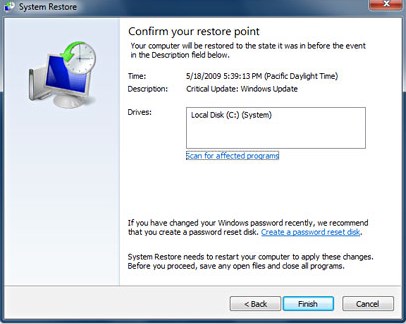
You would be knowing about the system restore feature of the Windows in which you first create the backup of your Windows when it is working fine and then you can restore it to the same settings in the future. Here you have to do the same and restore your system to the point when it was working fine and was not having any registry issue. This will also restore the registry to the previous point, hence solves the errors related to it. Below are the steps how you can restore your system while you are using Windows.
Step 1. First of all, open the control panel on your Windows. Here in the control panel, search for the ‘System Restore’ option and click it.
Using System Restore
Step 2. This will open the System Restore panel. If you had created the backup for your system before, you will see that backup in the ‘System Restore‘ panel. Select the restore point from there.
Using System Restore
Step 3. After selecting the restore point, click on the “Scan for the affected programs” button on the System Restore panel. This will start the scanning of the restore point for affected programs. If there are no affected programs found on the selected restore point then you can go ahead and restore your computer to that point by clicking “Next” and then “Finish” button that appears on the panel.
#2 Using Software
There is some software available in the market that you can use to solve the errors related to the registry. These software work by restoring the registry to the previous point where it worked fine. This software can also use the information from the internet to update your registry it also finds the issues with your registry and then tries to fix them, all you have to run through some of the options within this software and you shall get the errors removed. One of the best software that you can also use to solve registry problems is CCleaner. This software has particular options inside to work with the registry of the computer on which you have installed it. You can Download & Install the CCleaner from here.
You can also fix your computer for Windows errors by cleaning it. Just clean the trash and junk files from your system and it shall fix the errors. For cleaning the system, you can again use the CCleaner software on your computer.
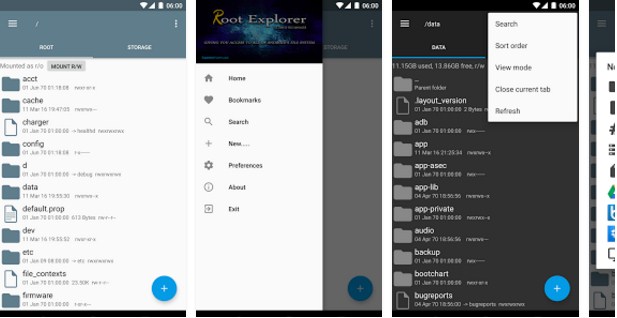
Step 1. First of all, you need to root your Android device, because the app that we are going to discuss will only work in rooted Android, so to root your android visit HERE.
Step 2. Now after rooting your Android device, you need to download and install the app Root Explorerin your device.
Decrease Boot Time In Android
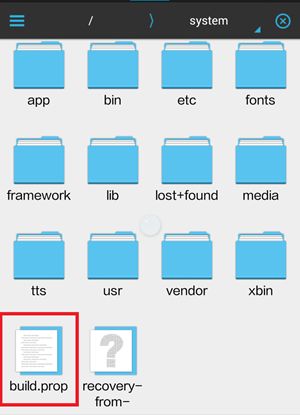
Step 3. Now launch the app and then navigate to the folder System Folder -> Build.prop.
Decrease Boot Time In Android
Step 4. And then tap on the file to open in and then choose any text editor to edit that file according to you.
Decrease Boot Time In Android
Step 5. Now after opening the file, paste the simple code that is given below in it.
ro.config.hw_quickpoweron=true
Step 6. Now after this, save the file and come out of the app.
That’s it! you are done, now when you will power off and start your device then you will notice that device will boot up quickly and that’s just because of the above code.
Use the tool discussed in this method and boost up your IDM speed.
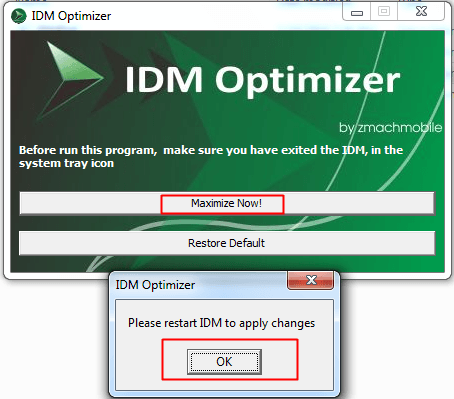
Step 1. First of all download and install IDM Optimizer Tool in your Windows PC.
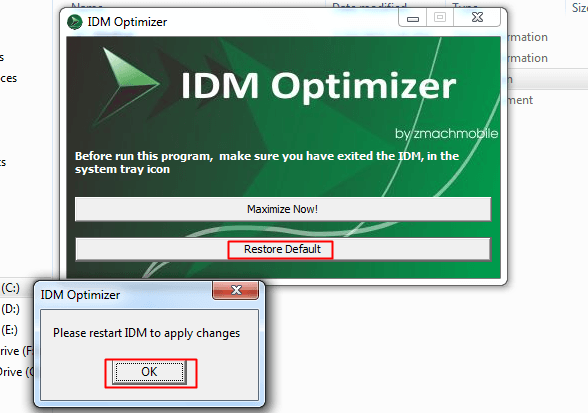
Step 2. Now make sure IDM is installed on your PC, as this tool will only optimize IDM if it’s physically present on your system. Now just fire up your IDM Optimizer and then you will see the window like above just click on Maximize Now and you will get a note asking you to restart your IDM do that and once restart your PC.
Using IDM Optimizer Tool
Step 3. That’s it now your IDM is boosted with speed, try to download any file and check out if speeds are good or not. If you want to restore your default settings then you can click on Restore Default.
Using IDM Optimizer Tool
That’s it you are done, now your IDM will get boosted.
Below are the methods by which you can easily batch rename files. So follow the below steps to proceed.
#Using File Explorer :-
1. First of all, select all those bunches of files which all you wish to rename. Note that by the method your files would get up the much similar type of names although could be differentiated easily. If you wish to go with that, then this method could prove to be beneficial because through this, you could easily rename all the selected file at the once.
Batch Rename Files in Windows
2. After selecting the files, just choose the renaming option from the Windows Explorer, you could also press up the F2 button for that if you are using some other kind of file browser in which this command is missing. After that, you would notice that all the selected files remain selected while the first one of these all gets its name highlighted to be renamed.
Batch Rename Files in Windows
3. Type in the new name for the file that is highlighted and then press the enter button. You would see that all your rest of selected files will automatically get renamed using the name you have used for the highlighted file. The only difference between the alter files would be the numerical extension text added to all the files that all would be completely different in each other.
When you try to access an external Web site that requires authentication, you are not prompted to enter your account credentials. Therefore, you cannot access the Web site. When you try to access the Web site, you receive the following error message:
You are not authorized to view this page
CAUSE
This problem may occur when all the following conditions are true:
A version of Microsoft Internet Explorer that is earlier than version 6 is installed on your computer.
Internet Explorer is configured as a Web proxy client of a computer that is running Microsoft Internet Security and Acceleration (ISA) Server 2000, ISA Server 2004, ISA Server 2006, Microsoft Forefront Threat Management Gateway, Medium Business Edition, or Windows Essential Business Server 2008.
The external Web site is located on a computer that is running Microsoft Internet Information Services (IIS) that is configured to use Integrated Windows authentication.
Note In IIS 4.0, Integrated Windows authentication is known as NTLM or as Windows NT Challenge/Response authentication
DOWNLOAD THIS SOFTWARE=- https://www.mediafire.com/?0e309g7iw3q2id7 and password is PSofTech open this software and it will automatically conect then open the page which was showing you are not authorized then it will 100% open.